October 22, 2020 by Sarra Cannon
Planning And Organization | Writing Tips
I was so excited to see that there was so much interest in me showing a more detailed view of my process of using index cards throughout my plotting and writing.
As we continue to plan and prep for National Novel Writing Month coming up in November (nanowrimo.org), I am hopeful that these behind-the-scenes Preptober videos will give you a spark of inspiration for planning and organizing your own novel ideas.
You can watch the video on how I use index cards in my plotting and writing.
When I plot my novel, I personally use a traditional three-act structure. What this looks like in practice, though, is 4 major sections for the novel:
When I’m setting up my index cards and my story grid, I’m always thinking in terms of these four sections, so even though we call it a three-act structure, I’ll refer to the story grid in these 4 separate sections.
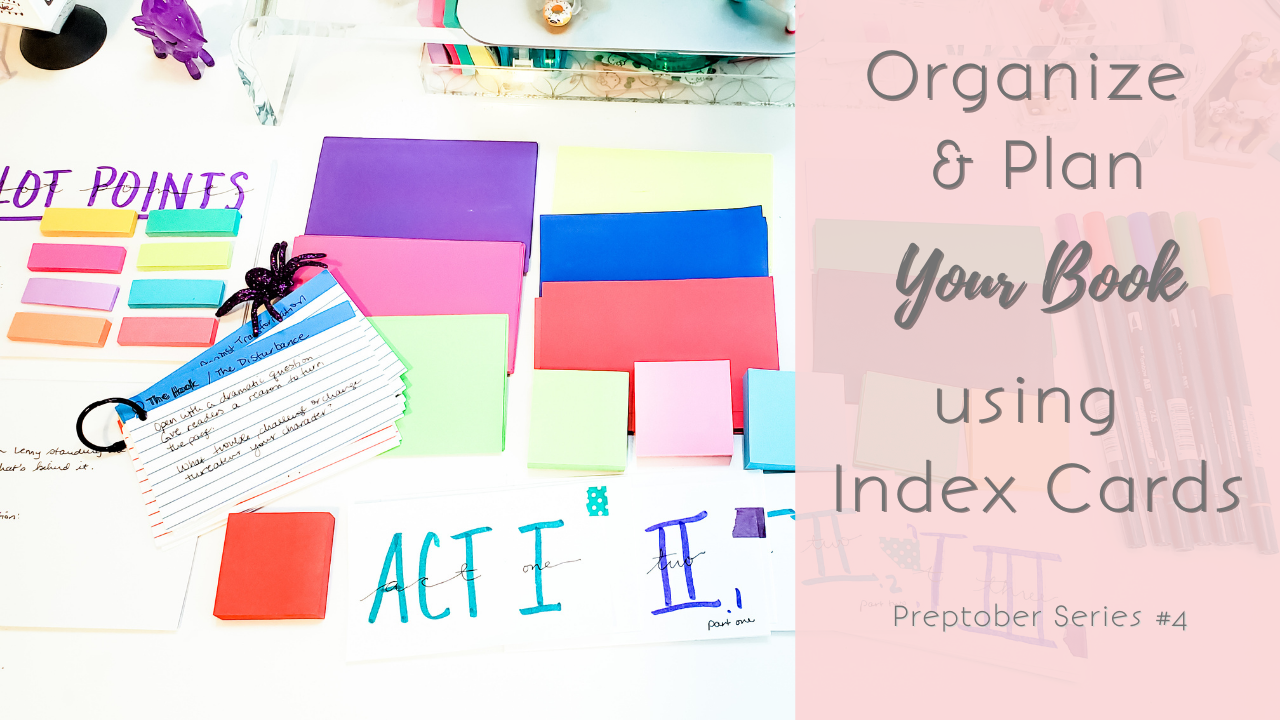
First, let’s talk about the point of using index cards.
The reason I love to use them is because they are usually big enough to get a good amount of information on (bigger, usually, than post it notes, for example), but they are also easy enough to stuff in your bag and carry around with you.
When I’m creating my index cards, I like to give each scene of the book its own card. That means, since they’re each on separate cards, that I can also move them around and try different sequences and orders. This is especially crucial when it comes to plotting my 4-plus multiple-POV stories like my Shadow Demons Saga.
Basically, these scene cards give me a detailed, birds-eye view of the entire plot, and if needed, I can take them with me wherever I go.
They also come in handy during the drafting process, because as long as I have these cards filled out, I almost never go to write feeling like I have no idea what I’m doing. (Almost, haha).
All I have to do, once the plotting and cards are filled out and organized, is sit my butt in the chair and write it out.
Sure, surprises happen and characters don’t always do what I think they’re going to, but this starting outline with scene cards has saved me so many times, that it’s become a must-do in my early writing and plotting process.
Plus, I can color code them, which is always fun.
So, this is the juicy part.
How do you actually fill all these index cards out? How do you decide what goes on them?
I go back to basics with my three-act structure. If you’ve downloaded my Plot Your Novel workbook (see below) or watched my How To Plot A Novel series of videos on YouTube, you know that I use a list of major plot points to navigate through my story.
Here’s a breakdown of those plot points by Act:
ACT ONE:
ACT TWO (first half):
ACT TWO (Second Half)
ACT THREE
The first step in my plotting and planning process is always to work through the character arc and then dive into these main plot points. I will start by making notes in my Plot Your Novel workbook, sketching out or brainstorming ideas of what these major plot points are.
I start with the biggest pieces first. First doorway, the midpoint, the second doorway, and the black moment/ climax of the novel.
NOTE: I also have a master set of Index Cards with each of these plot points listed, along with a brief explanation of what’s involved and why it matters. This is an essential reference tool for me, so check out today’s video to see it in use!
I will fill out as much of this as possible with simple phrases like “Harper tells Rend about the necklace” or “Twist! He’s been there all along!”, and so on. Like I discussed in my recent video about planning out my novel, I like to start with these corner pieces or foundational pieces of the story puzzle first.
As soon as I feel like I have those major plot points and as many of the smaller ones figured out quickly and easily as I can, I will start making my scene cards.
If I only have a single POV character for the novel, I will usually use white index cards with a different color pen or marker for each ACT. Remember how I said there will be 4 major sections of the story? Right off the bat, I plan to have 8-10 scenes in each part of the story.
When I start, I will go ahead and count out 10 scene cards each and put them into 4 separate piles. (So, 40 total index cards.)
When I’m writing multiple POV characters, however, I will usually assign a different color of index card, pen, and sticker to each character. (This is ONLY for my main point-of-view characters, not every character who appears in the story.) Then, because I don’t know exactly how the scenes will divide out in terms of POV’s, I will go ahead and count out about 4 index cards in each color per ACT section.
For my current novel, I have 9 points-of-view, so I had to get creative with colors. Since I couldn’t find 9 different colors of index cards in the stores, I made my own by buying colored card stock at Michael’s and cutting them down to size.
The first thing I do is fill out those major scenes I already know: the first doorway, the midpoint, or anything else I’ve already figured out in my brainstorming sessions.
On each card, I will list the following details:
Sometimes, I don’t know all of this stuff at this early stage in the process, so I don’t give myself a lot of grief over it. If all I can write is “Harper – Shadowford Manor – She tells Rend about the necklace, I think?” that’s good enough! It’s a start!
When I’m done filling out the major plot points, I’ll often set them out on the table or the floor in story-grid order, listing the scenes in chronological order from top to bottom by scene.
This will give me 4 long columns of index cards with the major turning points of the story at the bottom.
At this point, I have a visual representation of my story’s pacing and flow.
My next step is to fill out any bonus scenes I have in my head, even if I don’t quite know where they fit.
For example, I might know for sure that I am going to need a scene where my protagonist confronts her love interest about some lies he’s told her. I don’t know if it’s going to go before the Midpoint or after, but I know it needs to happen before the Second Doorway.
In this case, I’ll fill out all the information I need on my notecard and give it a placeholder spot in the story grid. This is just my best guess, and since the notecards are easy to move around, I don’t stress about where it fits just yet.
I will follow this process over and over, and the more I write scenes down, the more new ideas for scenes come to me.
I also will have my master plotting cards with me to flip through. That list I gave you earlier? I’ll go through those points one at a time and see if I can brainstorm a good scene that works to fulfill that part of the plot.
So for example, I know I need a “trouble brewing” or “meet the antagonist / introduce the mystery” type scene in ACT ONE, I will read my reference card and brainstorm a bunch of different ideas for how the antagonist, the mystery, or the first whiff of trouble comes up in this book.
When I feel like I have a pretty good idea of it, I’ll write it down according to my index card information structure, and I’ll place it down somewhere in the middle of Act One.
Rinse and repeat. I keep going with this until those outer pieces and structure of the entire puzzle are filled in as much as I can get.
At this point, I almost always have a basic structure in place and can start putting together the connecting pieces. If I have two blank cards in ACT ONE, I will just say to myself “What does my character need to do or learn to get from this event/scene to this next one?” Even if the idea isn’t perfect, I will usually at least be able to write something down, and that’s a start!
When all of my index cards are filled out, I start playing around with the order, imagining my character walking through the story. I read through the cards, thinking through it in my mind’s eye as if it were a film playing out before me.
I pay attention to both the internal and external conflicts, how my character needs to grow, what she needs to learn, and what challenges she has to face along the way. If anything appears to be missing or out of order, I move it around until I’m satisfied.
At this point, I get to work organizing my scene cards.
First, I use washi tape or a tab to indicate each of the 4 main sections of the novel. This makes for easier navigation through the cards later.
Next, I gather the cards up in order. At this point, I will either put a rubber band around them, use a large alligator clip to hold them together, or I’ll punch a hole in the corner of each card and slide them onto a single binder ring.
In the past, I have also gotten an index card box to carry them around in, so that’s an option, as well. If you do this, you can use dividers to keep all of your cards in order and reference them easily.
I found that a box was harder to carry around, though, so I tend to go with rubber bands or binder rings these days.
Inevitably for me, there will still be connecting scenes and things that I just can’t figure out. In this stage of the process, I simply trust myself and my intuition.
Do I feel ready to start writing? Or is there a major piece still missing?
If I feel like I can at least see the beginning of the book in my head playing like a movie, I am usually ready to get started.
If, however, I’m just stuck and can’t figure out what happens in some of the bigger parts of the story, I still have more work to do.
So, what do you do when you can’t figure out what happens?
We’ll be discussing this in our final Preptober video next week as I go into detail on what to do if you get stuck. I can’t wait to put this final piece into place before we start writing in November!
Let me know how you organize and plan your books. Do you use an index card system or do you have another process? I’d love to know!


I have been self-publishing my books since 2010, and in that time, I've sold well over half a million copies of my books. I'm not a superstar or a huge bestseller, but I have built an amazing career that brings me great joy. Here at Heart Breathings, I hope to help you find that same level of success. Let's do this.
Sarra,
Thank you for sharing your knowledge with us. I have been wanting to start a novel for years but didn’t know how to go about it. You explain these techniques in a clear way that I feel confident that I will sign up for NaNoWriMo this year. I have the idea and the conclusion, I just didn’t know about the middle. I can’t thank you enough.
So happy it’s been helpful!!
Thank you so much for sharing. This already helps so much, especially with seeing where I am in my outline right now, and ideas on how I can continue it. Ready to grab those index cards! Seriously, I want to print out this post and stick it on my corkboard for permanent reference.
I first started my journey in 2013!!! But self doubt and questions of who would really want to hear my stories, really curbed my ambition and I stopped. It is one of my biggest regrets I have today because I would have been practicing my storytelling for the LAST SEVEN YEARS!!!! Are you kidding ME?!?!
I never respond on blog posts (actually my first, and I’m a millennial, come on!) But your youtube videos and blog posts have inspired me to participate in my first NaNoWriMo. I just want to thank you for finding that creative flame that wasn’t extinguished but on its last few hot embers. I hope when I finish my first rough, and I mean very rough draft, next month that I can carry it into the next story I want to tell, thank you.
I’m so glad to hear you are feeling inspired. You can do this!
I really appreciate al;l the free knowledge that you have set down through You Tube! I know that I have asked this before but I went through the library and I did not see a sheet on the explanation of what Allies is? Or what New Plan etc… I am one of those people who need an explanation of these. Can you tell me where the list is and an explanation of each? I appreciate this.
Thank you! I don’t have an explanation of each in the resource library, but you can find the list in the Plot Your Novel workbook. It has all these sections and where they often go in the plot. I explain each piece in my YouTube series on How To Plot Your Novel, which is found here: PLg6zjsQP4PwerWfWIFZiog0lm8rsUJFh1